Index
- Walking on ice
- Walking in Snow
- Layering
- What About The Extremities?
We all love the white-glittering snow. The curiosity of that shining snow crystal drives us to forget everything. Though the snowfields look like the perfect icing on the cake, walking on the snow is not a cakewalk. Only those who have hiked in snow can understand the pain. But, following some easy techniques can make the pain go away.
Here are some tips for walking in the snow efficiently.
Walking on Ice
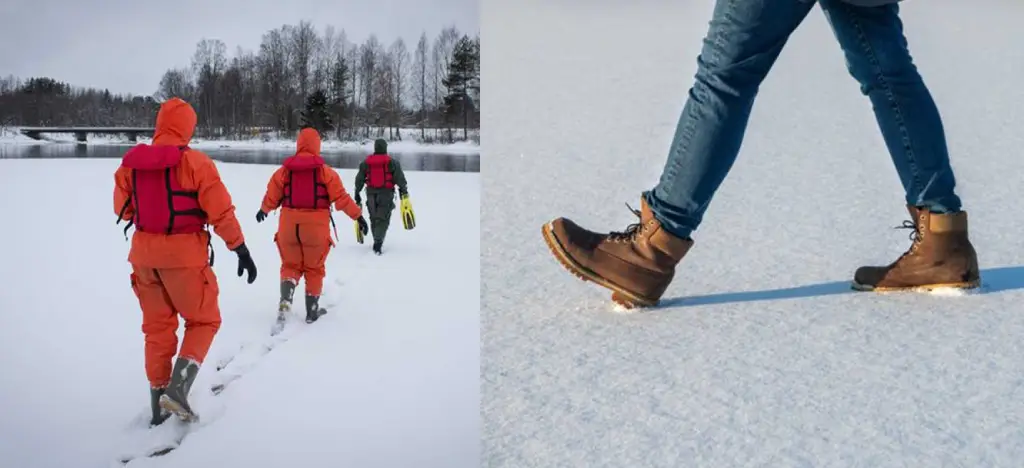
When you’re on a winter trek, it is almost impossible to avoid walking on ice at some points. Slipping on ice may sometimes cause grave injuries and you don’t want that. So how do you walk properly on ice? Put on the right footwear and just imagine yourself as a penguin and do what a penguin does and I am not kidding! You can just take a look at the image below.
- Use crampons or microspikes if the snow transforms into hard ice. Crampons or microspikes work best if the ice is not that hard. If it is hard then a lot of strength is required to fix the spikes.
- In case of slippery hard ice, like Chadar trek, gumboots must be used.
- While ascending, keep the foot straight, bend your knees and bend from the hip.
- While descending, keep your foot straight or slant as per your comfort level. But make sure the whole foot sole comes in contact with the ground. This gives a lot of friction and avoids slipping. Take small steps. Do not run.
Walking in Snow
Walking in snow is exhausting. The snow sucks in a lot of energy to insert the foot inches down, sometimes feet, then pull it out. However, some techniques can be used to save energy.
- Climbing up: Kick in with your toe and ascend like climbing stairs. On previously formed steps (steps created by your guide or trekkers ahead of you), try to place the whole foot on the step. Don’t raise the lower foot unless you are sure the first foot is stable. Many times, your foot may unknowingly go deep in snow. Do not get scared, just get support on your trekking pole and look for another stable step.
- Climbing down: While descending, use your heel to lock your feet in the loose snow. Put the entire weight on the foot and slowly let your feet slide down (a few inches) until your foot is stable. Only after that can I take the next step and follow the same technique for it.
- Traverse or Moving Sideways: In the case of traversing you need to sideways mostly in a straight line without going up or down the slope. To do so use foot edges to kick steps. Try to create steps by pushing in the foot edges, putting weight on the foot and leaning towards the mountainside. Never put your weight on the valley side. Raise the next foot only after the first foot is stable. Place the next foot ahead of the first, following the same technique. Try to use a trekking pole for balance.
Important points:
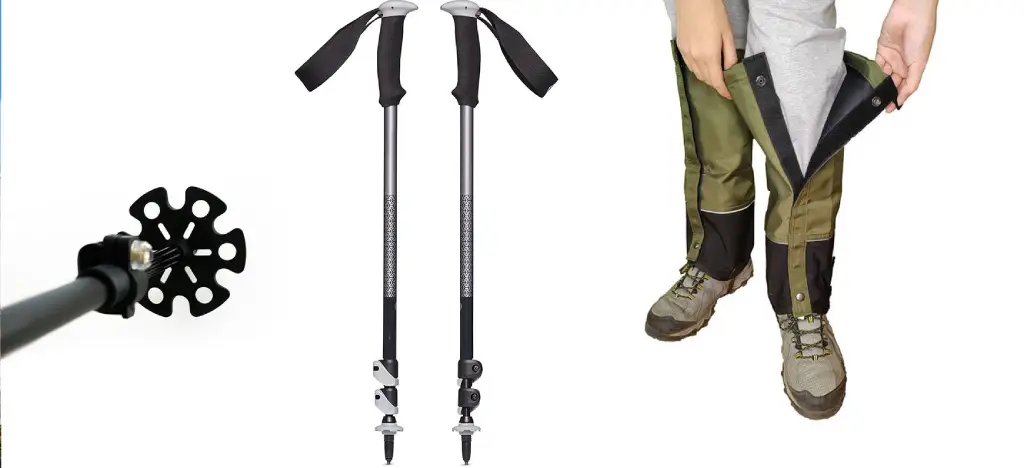
- Always use a trekking pole with a snow cap. It helps a lot in case of feet-deep loose snow and also on hard snow.
- Observe your Trek Leaders or guides. Try to copy their footwork, especially the kicking techniques.
- Use an ice axe only if you have prior experience in handling ice. Always remember that an ice axe may turn into a weapon if not used properly.
- Use gaiters for loose snow.
- Preferably wear waterproof shoes when trekking in loose snow. After long hours of walking in the snow covering your shoes, the shoes get wet. Therefore, make sure your shoes are waterproof. Check out our video here on how to select proper hiking shoes.
- Sometimes, a lot of strength is required for kicking in extremely hard snow using crampons.
- For Stok Kangri or Kang Yatse, snow boots like Scarpa are used to avoid frostbite. Low temperatures above 5000 metres and long hours of exposure to snow during summit attempts affect the feet.

Layering
The Himalayan winters are spellbindingly beautiful but they are also very harsh. The extreme weather conditions can be pretty rough to bear if you aren’t wearing the right clothes. This is where the concept of Layering comes into play. Layering is so important that it can make or break the experience of your trek.
What Is Layering?
To understand the benefits of layering, we first need to understand what layering is. In the mountaineering world, Layering is described as the concept of dividing the clothing into different layers for proper heat distribution throughout the body and weather protection. The right kind of layering keeps your body warm in cold conditions (often subzero temperatures) and at the same time, it protects you against extreme temperatures and cold-related illnesses like hypothermia.
Understanding The Different Layers – Purpose & The Right Material For Each Layer
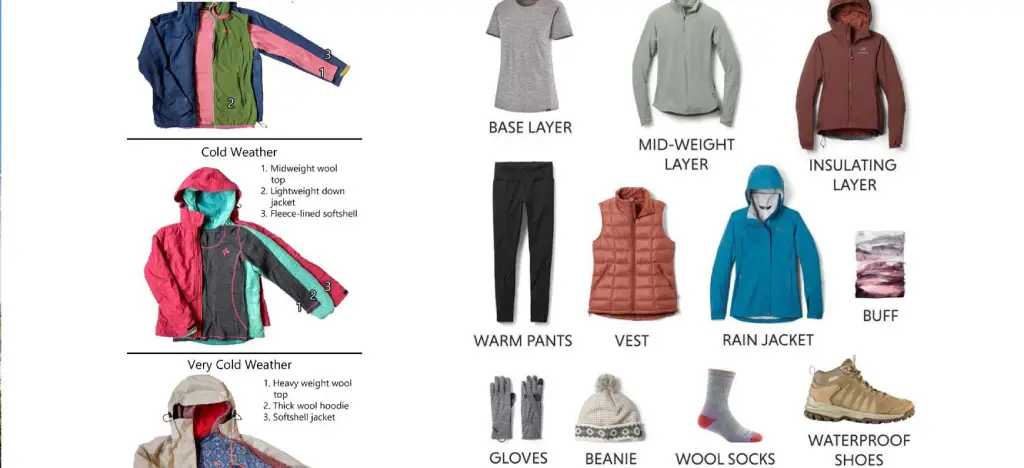
Understanding how to layer your clothes is an important skill if you want to spend more time outdoors. When it comes to layering, there are three main layers that you should be familiar with.
- The First Layer Or The Base Layer
This is the very first layer that you put on and comes right next to your skin. When you are involved in any physical activity like trekking, your body produces a lot of heat and to regulate this heat production your body perspires. So, the layer that you wear next to your skin should be such that it wicks the moisture away and keeps your body dry. This prevents any cold-related illnesses from affecting you.
If you have a wet base layer in extremely cold conditions of the Himalayas, it can be detrimental to your health and in many cases can be life-threatening. Prolonged exposure to such cold and damp conditions can cause illnesses like hypothermia that can escalate pretty quickly!
Best material for the base layer: A quick-dry T-shirt or a warmer composed of hydrophobic material like Polyester or Nylon are good options. Fine wools like merino also make for good base layers.
What to avoid: Avoid cotton base layers at all costs. Cotton may be a good material for everyday use but up in the mountains, it is not. This is because cotton traps moisture and when you trek, you perspire a lot. The cotton clothing will absorb it all and will stay wet for a long time. This will cool your body down and if it is windy, a wet cotton layer is just going to chill you down to the bone. In worst-case scenarios, it can lead to hypothermia, frostbite, etc. Cotton is therefore a big no when it comes to a Himalayan trek.
- The Middle Layer Or The Insulation Layer
The insulating layer does just that it insulates your body against cold weather conditions protecting it against the extreme temperatures. The insulating layer consists of clothing that can trap body heat in the form of air pockets. It is recommended to carry multiple light layers for this purpose as different weather conditions require different degrees of warmth.
Best material for insulation layer: A padded jacket, a woollen sweater, or a fleece jacket are great options for insulation. You can also use multiple insulating layers. For example: you can put on a fleece jacket and a down jacket on top of it and both will serve the same purpose.
What to avoid: A big bulky jacket for insulation is not recommended. You may be tempted to put on that jacket to avoid the cold but trust us when we say that the best way to beat the cold is to build up layers of protection. The biggest benefit of layering is that you can deduct a layer or add on one depending on the temperature condition while a big bulky jacket does not offer you that flexibility.
- The Third Layer Or The Shell Layer
The outermost layer or the Shell Layer Protects you against weather conditions. Weather at high altitudes can change spontaneously and so it is crucial that you have the necessary protection while on the trek. The outer layer should be such that it protects you against conditions like rain, snowfall, excess winds etc.
Best material for weather protection: Make sure to choose a material that is both water and windproof. A waterproof jacket will protect you against both rain and snow. However, this layer should be worn only if necessary. The downside of waterproof layers is that they are not quite breathable and as such they can trap moisture inside your body.
What About The Extremities?
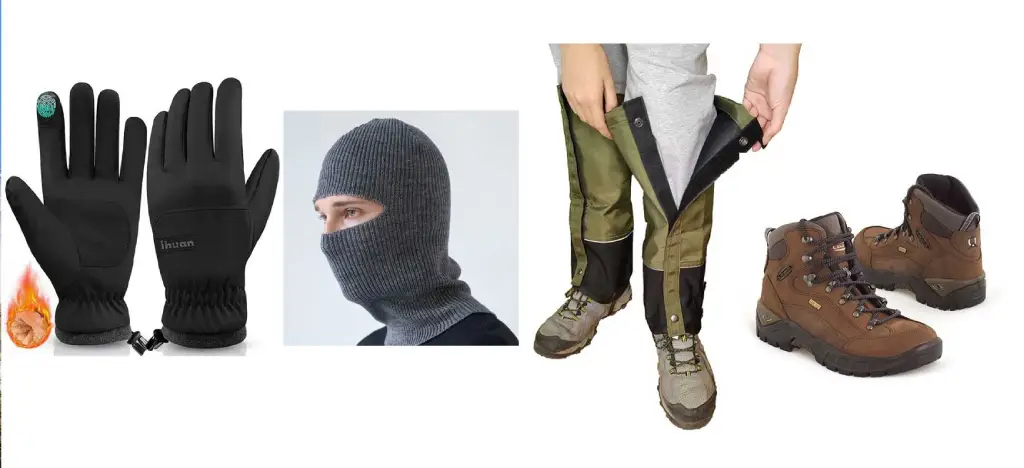
While you keep your body warm, you cannot forget about the extremities. Warm blood rushes from the extremities towards your vital organs to keep them safe in cold conditions and hence it is necessary to keep your hands, feet, and your head warm.
Head Gear: A woollen cap or a balaclava.
Gloves: A glove liner followed by a thick pair of woollen gloves
Socks: A pair of synthetic liners followed by a thicker pair of woollen socks.
Shoes: A good pair of trekking shoes big enough to accommodate the woollen socks. We recommend buying one size larger shoes for winter trekking.
Gaiters: For snow treks, gaiters are a must. These leg coverings prevent snow from getting inside your shoes and keep them dry and warm.
The gist of all this talk is that layering helps you regulate your body’s warmth as and when needed. If you are feeling a little too cold, you can add a layer on or maybe you have started sweating so you can conveniently take one layer off, something that would be quite difficult if you hadn’t layered up!

.webp "Hampta Pass Trek")

.webp "Gaumukh Tapovan Trek")


.webp "Ranthan Kharak Trek")


.webp "Dayara Bugyal Trek")


.webp "The Best Places to Visit in Dehradun")
The Best Places to Visit in Dehradun
.webp "Phulara Ridge Trek - Explore the Hidden Ridge in Himalayas")
Phulara Ridge Trek - Explore the Hidden Ridge in Himalayas
 (1).webp "Trek Update: Valley of Flowers and Hampta Pass are Fully Accessible for Exploration")
Trek Update: Valley of Flowers and Hampta Pass are Fully Accessible for Exploration
 (1).webp "Har Ki Dun - Best Autumn Trek")
Har Ki Dun - Best Autumn Trek

Har Ki Doon Trek 2024 - Walking Through the Valley of Gods
.webp "Best Time for Kedarkantha Trek in 2024")
Best Time for Kedarkantha Trek in 2024
.webp "Post-Monsoon Marvel of EBC Trek and Annapurna Circuit Trek")
Post-Monsoon Marvel of EBC Trek and Annapurna Circuit Trek
 (1) (1).webp "Discovering Goechala - A Himalayan Adventure")
Discovering Goechala - A Himalayan Adventure
 (2).webp "Adi Kailash Yatra : A Spiritual Journey to the Abode of Lord Shiva")
Adi Kailash Yatra : A Spiritual Journey to the Abode of Lord Shiva
.webp "Know the Hidden Gem- The Brammah Valley Trek")
Know the Hidden Gem- The Brammah Valley Trek